TensorFlow doesn’t support macOS or AMD/ATI-based GPUs because it uses CUDA, an NVIDIA-specific API. However, many AMD GPUs support OpenCL and Metal. See this hardware compatibility list for more information.
To support GPU-backed ML code using Keras, we can leverage PlaidML. Below are the steps to install TensorFlow, Keras, and PlaidML, and to test and benchmark GPU support.
These instructions assume a fresh install of macOS 10.15 Catalina using the system python installation. If you installed Python from a package or via homebrew then you may not experience all of the same issues mentioned below.
Download TensorFlow and Keras Link to heading
First, update pip. Then install TensorFlow.
pip install --upgrade pip
pip install tensorflow
Install PlaidML Link to heading
pip install plaidml-keras plaidbench
On macOS 10.15 the system-installed Python does not permit system-wide package installs, so we need to help the plaidml-setup binary locate the plaidml library.
export PLAIDML_NATIVE_PATH=/Users/[username]/Library/Python/3.7/lib/libplaidml.dylib
export RUNFILES_DIR=/Users/[username]/Library/Python/3.7/share/plaidml
Replace [username] with your username before executing the commands, and don’t forget to add them to your ~/.zshrc or ~/.bashrc.
Configure PlaidML Link to heading
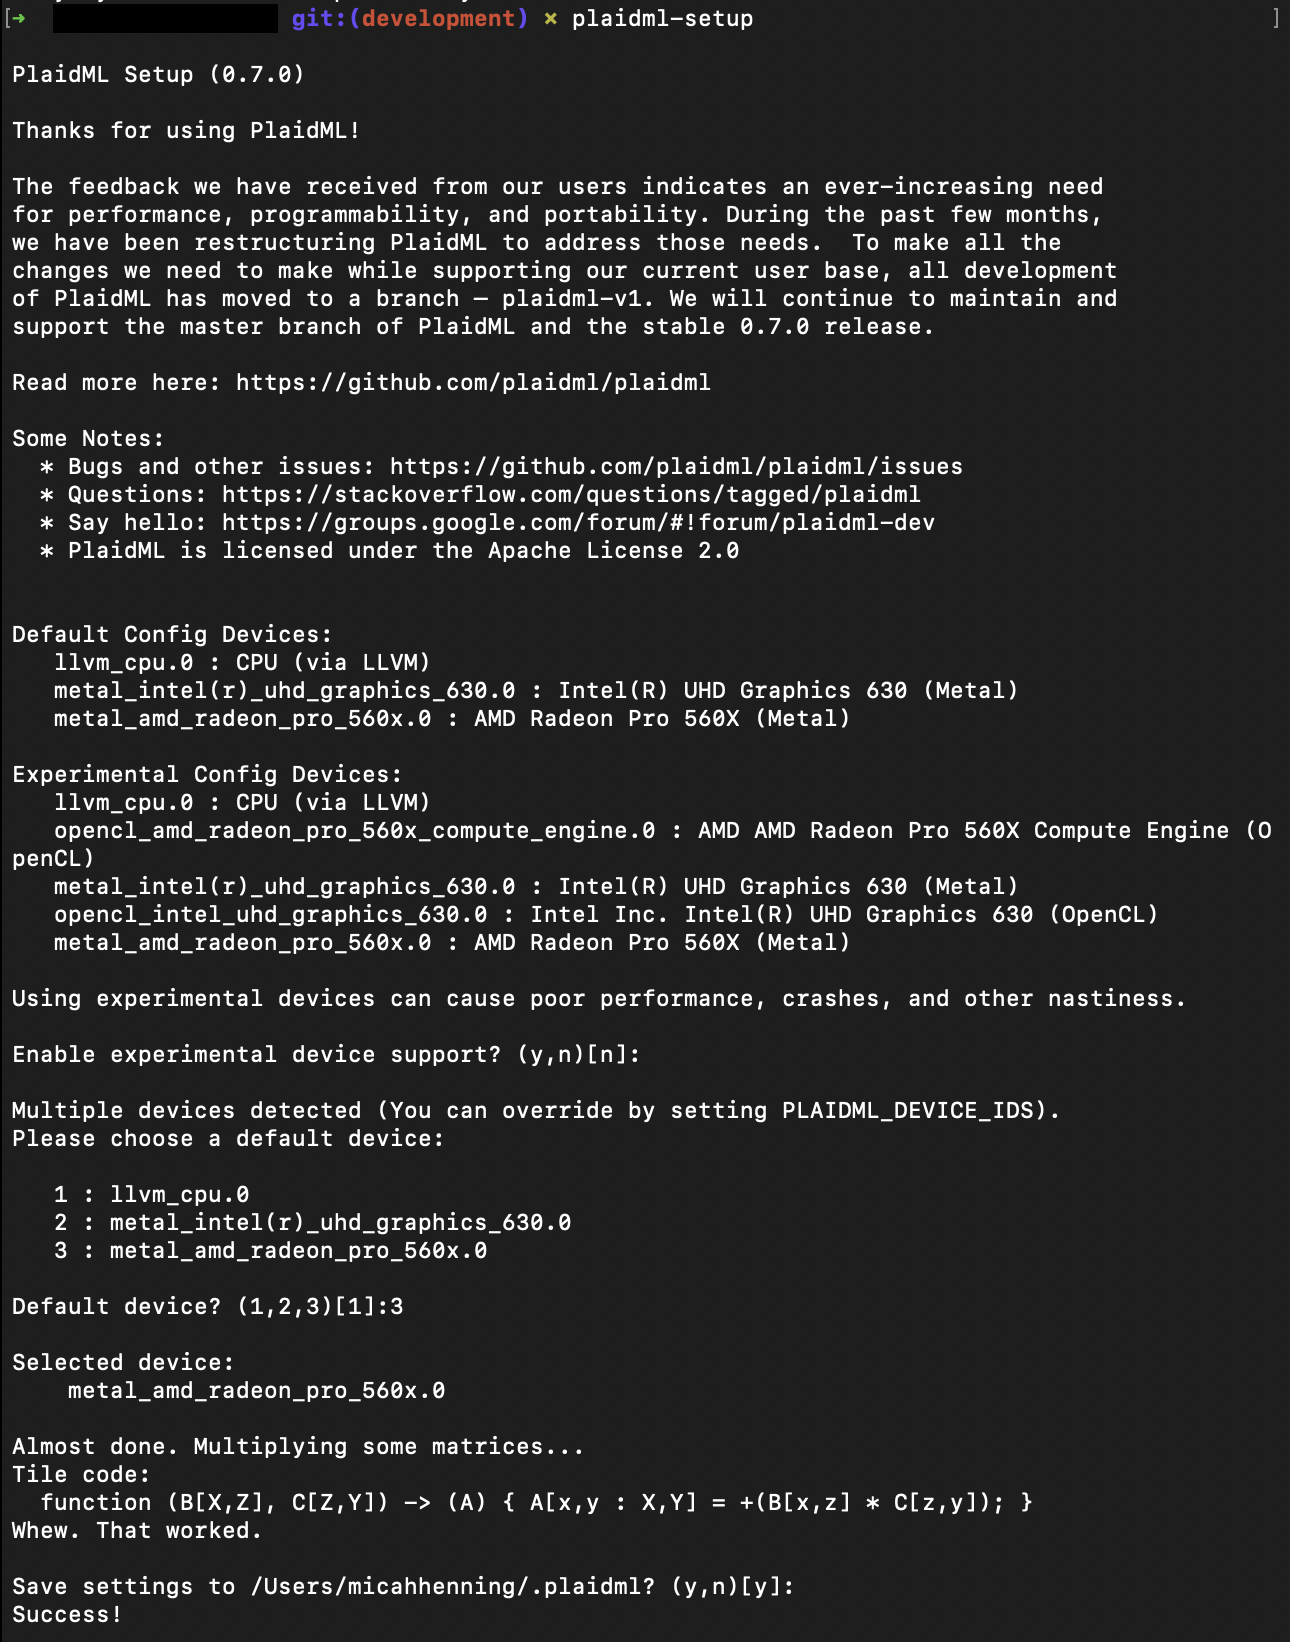
plaidml-setup
You may choose to enable experimental device support, which gives you the OpenCL drivers in addition to the metal ones. You should pick your faster GPU as the default. Then write the configuration file.
Test PlaidML Link to heading

To test PlaidML, we can use the installed plaidbench command. However, if using the system Python install on macOS Catalina, we will need to install root SSL certificates, otherwise error [SSL: CERTIFICATE_VERIFY_FAILED] will throw during the test. (Reference) Let’s do that now.
pip install certifi
Then run this script to download root certificates:
cat > install_certifi.py << EOF
# install_certifi.py
#
# sample script to install or update a set of default Root Certificates
# for the ssl module. Uses the certificates provided by the certifi package:
# https://pypi.python.org/pypi/certifi

import os
import os.path
import ssl
import stat
import subprocess
import sys

STAT_0o775 = ( stat.S_IRUSR | stat.S_IWUSR | stat.S_IXUSR
| stat.S_IRGRP | stat.S_IWGRP | stat.S_IXGRP
| stat.S_IROTH | stat.S_IXOTH )


def main():
openssl_dir, openssl_cafile = os.path.split(
ssl.get_default_verify_paths().openssl_cafile)

# print(" -- pip install --upgrade certifi")
# subprocess.check_call([sys.executable,
# "-E", "-s", "-m", "pip", "install", "--upgrade", "--user", "certifi"])

import certifi

# change working directory to the default SSL directory
os.chdir(openssl_dir)
relpath_to_certifi_cafile = os.path.relpath(certifi.where())
print(" -- removing any existing file or link")
try:
os.remove(openssl_cafile)
except FileNotFoundError:
pass
print(" -- creating symlink to certifi certificate bundle")
os.symlink(relpath_to_certifi_cafile, openssl_cafile)
print(" -- setting permissions")
os.chmod(openssl_cafile, STAT_0o775)
print(" -- update complete")

if __name__ == '__main__':
main()
EOF
Now install the Python root certs:
sudo python3 install_certifi.py
Finally, we can test. Open your Activity Monitor and activate GPU History (Cmd+4). Then run these commands:
plaidbench keras mobilenet
plaidbench --batch-size 16 keras --train mobilenet
Compare output with image. Verify a spike in GPU activity.
Test with Hello VGG Link to heading
On the PlaidML Github README, there is a sample Hello VGG script demonstrating how to use PlaidML with Keras. Here is that script:
#!/usr/bin/env python

import numpy as np
import os
import time

os.environ["KERAS_BACKEND"] = "plaidml.keras.backend"

import keras
import keras.applications as kapp
from keras.datasets import cifar10

(x_train, y_train_cats), (x_test, y_test_cats) = cifar10.load_data()
batch_size = 8
x_train = x_train[:batch_size]
x_train = np.repeat(np.repeat(x_train, 7, axis=1), 7, axis=2)
model = kapp.VGG19()
model.compile(optimizer='sgd', loss='categorical_crossentropy',
metrics=['accuracy'])

print("Running initial batch (compiling tile program)")
y = model.predict(x=x_train, batch_size=batch_size)

# Now start the clock and run 10 batches
print("Timing inference...")
start = time.time()
for i in range(10):
y = model.predict(x=x_train, batch_size=batch_size)
print("Ran in {} seconds".format(time.time() - start))
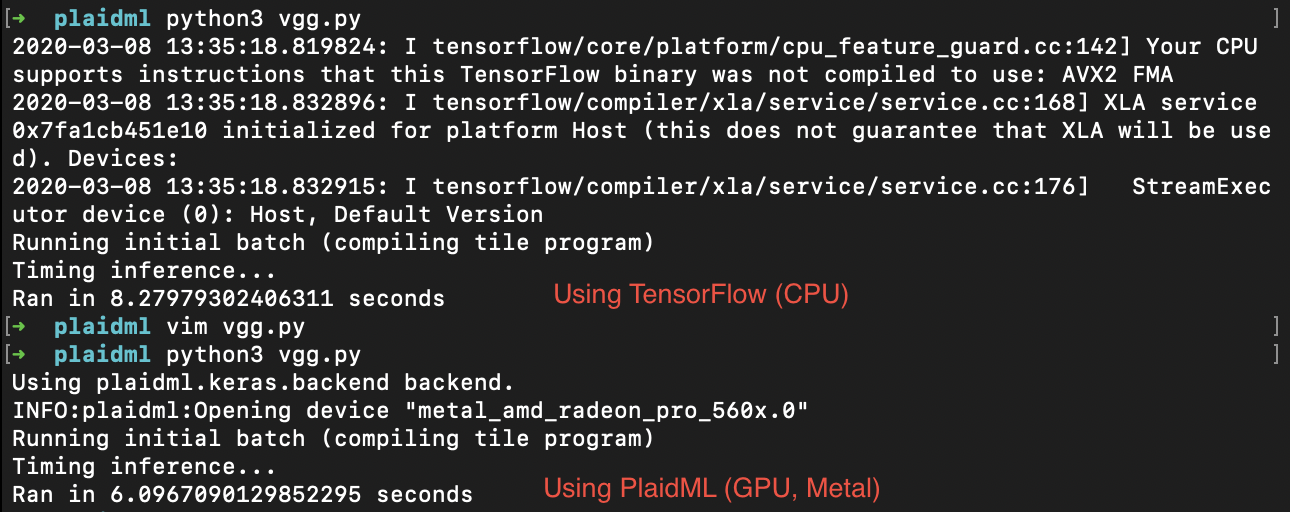
Execute like so after saving file as vgg.py:
python3 vgg.py
If you want to compare with TensorFlow, which uses the CPU on macOS instead due to lack of CUDA support, comment out the os.environ and keras import statements and replace with this:
#!/usr/bin/env python

import numpy as np
import os
import time

#os.environ["KERAS_BACKEND"] = "plaidml.keras.backend"

#import keras
#import keras.applications as kapp
#from keras.datasets import cifar10

import tensorflow.keras
import tensorflow.keras.applications as kapp
from tensorflow.keras.datasets import cifar10

(x_train, y_train_cats), (x_test, y_test_cats) = cifar10.load_data()
batch_size = 8
x_train = x_train[:batch_size]
x_train = np.repeat(np.repeat(x_train, 7, axis=1), 7, axis=2)
model = kapp.VGG19()
model.compile(optimizer='sgd', loss='categorical_crossentropy',
metrics=['accuracy'])

print("Running initial batch (compiling tile program)")
y = model.predict(x=x_train, batch_size=batch_size)

# Now start the clock and run 10 batches
print("Timing inference...")
start = time.time()
for i in range(10):
y = model.predict(x=x_train, batch_size=batch_size)
print("Ran in {} seconds".format(time.time() - start))
When using TensorFlow, we have to import Keras from TensorFlow instead of calling directly in order to avoid AttributeError: module 'tensorflow' has no attribute 'get_default_graph' (Reference).
By the way, if you get error RuntimeError: dictionary changed size during iteration (Reference) then you either need to upgrade to Python 3.7.5 or edit line 48 of this file:
sudo vim /Applications/Xcode.app/Contents/Developer/Library/Frameworks/Python3.framework/Versions/3.7/lib/python3.7/linecache.py
Change line 48 from:
for mod in sys.modules.values():
to:
for mod in list(sys.modules.values()): #for mod in sys.modules.values():
And that’s it! Just add the os.environ line to your jupyter notebooks and python scripts and you can leverage internal and external GPUs on macOS Catalina for machine learning in keras.