If you are using a Sonicwall Firewall, you may be interested in learning how to setup Virtual Private Network access to utilize network resources away from the workplace, assuming, of course, you’ve paid for the VPN licenses…
This post sprouts from an issue with Windows 7 64-bit and Sonicwall Global VPN Client 64-bit v4.2.6.0305 (the latest version as of the date of this post.) A client of mine had a strange issue where occasionally, the VPN connection would not work quite right. When connecting, he would see the following dialog box pop up:
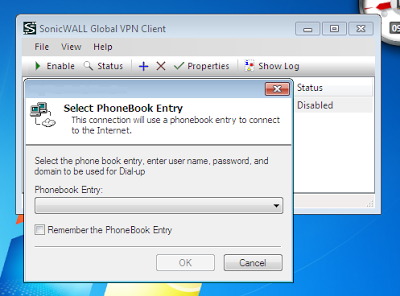
(Please note: IP addresses and connection names have been hidden in the images.)
When researching the problem on the Internet, I noticed that this dialog box may sporadically appear when one of the following conditions are met:
- The user is not connected to the Internet.
- Internet Explorer has been uninstalled.
I was using GoToAssist when I saw this message, so he was obviously connected to the Internet. Additionally, IE was installed, and I even uninstalled and reinstalled it again just to make sure there weren’t any changes to IE that would have caused the incident. To no avail, I continued onward in quest of solving this curious predicament.
First, I changed the connection settings to use LAN only to get rid of the dialog box.
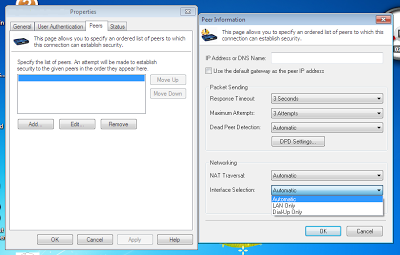
After this, the connection was successfully established, but no data could pass through. I could not ping any host or access any service that resided on the remote network. I tried removing and reestablishing the connection, uninstalling and reinstalling the Global VPN Client, and even jumping up and down in frustration. None of these fixed the issue.
At first, I did not think there was any misconfiguration on the Sonicwall Firewall because four other people, one of which used Windows 7 32-bit, could successfully establish a connection and use network resources.
After contacting and working with the horrible Sonicwall technical support, I did finally come to a resolution. The virtual adapter settings for the VPN connection in the firewall were set to not lease any IP addresses via DHCP. Here is what we needed to have set up in order for the resolution to arise:
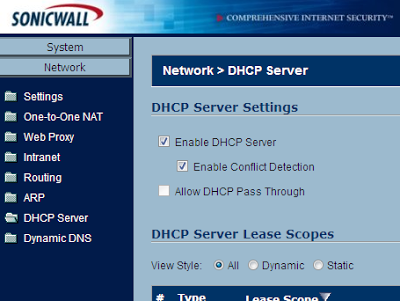
While it is not necessary for the Sonicwall Firewall to host the DHCP server, a DHCP server is probably required for this fix to work. To set up DHCP in a Sonicwall Firewall, navigate to Network -> DHCP Server. Select both Enable DHCP Server and Enable Conflict Detection. After that, create a DHCP Lease Scope under the appropriate heading. Apply the settings.
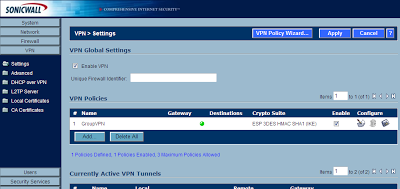
Next, under VPN -> Settings there should already be a GroupVPN policy. I believe this should be here by default. If it is not, you can use the VPN Policy Wizard to create a new one. Edit the GroupVPN policy by selecting the pencil and paper icon.
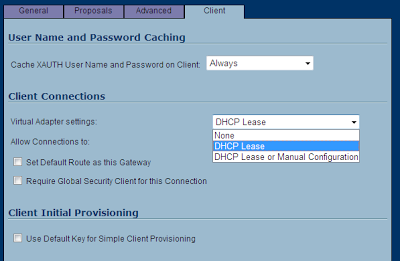
On the Client tab, under Client Connections, there is a drop down list for Virtual Adapter settings. Make sure DHCP Lease is selected. I had None selected at first, which Windows 7 64-bit doesn’t cooperate with very well.
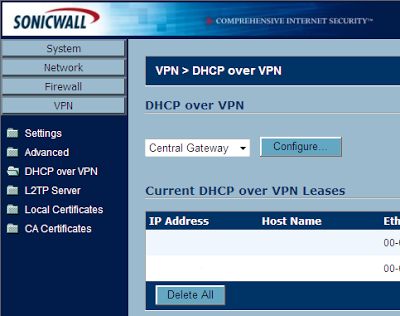
Next, go to VPN -> DHCP over VPN. You can view current leases from here. Go ahead and just select the Configure button.
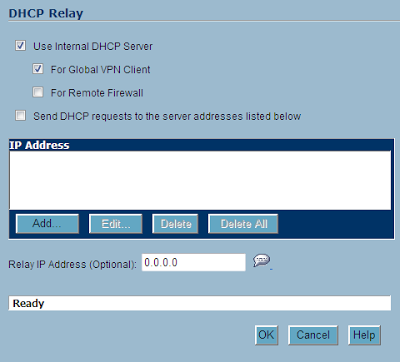
A new window opens. If you are using the internal Sonicwall DHCP server, ensure both Use Internal DHCP Server and For Global VPN Client are selected. If you are using a different DHCP server, instead check Send DHCP requests to the server addresses listed below. Add the appropriate DHCP server IP address. Hit OK.
That’s it. This solved my problem. The Sonicwall technical support representative has no idea why the “None” option for the virtual network adapter did not work correctly, but the only operating system that had issues was Windows 7 64-bit.