Transferring domains between AWS accounts in Route 53 can be done without domain renewal. This is a procedure for transferring a domain in AWS without downtime.
In AWS Route 53, a domain contains contact details, name servers, domain name status codes, registration and expiration dates, and optionally a DNSSEC public key. All of these details transfer automatically through this process and will have to be updated in the destination account before the resources in the source account are removed, otherwise there will be an outage for all DNS-resolved services, like websites, email, and automatic certificate renewal.
First, initiate the transfer from the source account Link to heading
This process must be done through the API or CLI. At the time of this post, cross-account domain transfers cannot be initiated or accepted via the web console. I recommend using AWS Vault to manage your AWS access credentials.
# With AWS Vault
aws-vault exec [profile] -- aws --region us-east-1 route53domains transfer-domain-to-another-aws-account --domain-name [domain] --account-id [account number]

# Without AWS Vault
aws --region us-east-1 route53domains transfer-domain-to-another-aws-account --domain-name [domain] --account-id [account number]
The region must be specified as us-east-1 for this command to work. That must be where Route 53 services operate for region Global. Replace items in square brackets with their appropriate values. The account number refers to the destination AWS account.
Note the password in the command response.
Second, accept the transfer from the destination account Link to heading
This process is a little trickier since the password may contain special characters that bash or similar shells interpret, so we use JSON instead. We must also use the CLI.
# Create JSON skeleton file
cd /tmp
aws route53domains accept-domain-transfer-from-another-aws-account --generate-cli-skeleton > request.json

# Edit request.json to populate the DomainName and Password fields

# Accept the domain (using AWS Vault)
aws-vault exec [profile] -- aws --region us-east-1 route53domains accept-domain-transfer-from-another-aws-account --cli-input-json file://request.json

# Accept the domain (without AWS Vault)
aws --region us-east-1 route53domains accept-domain-transfer-from-another-aws-account --cli-input-json file://request.json

# Clean up
rm request.json
The domain should appear in your AWS console immediately under Route 53 > Registered domains.
Third, update domain details Link to heading
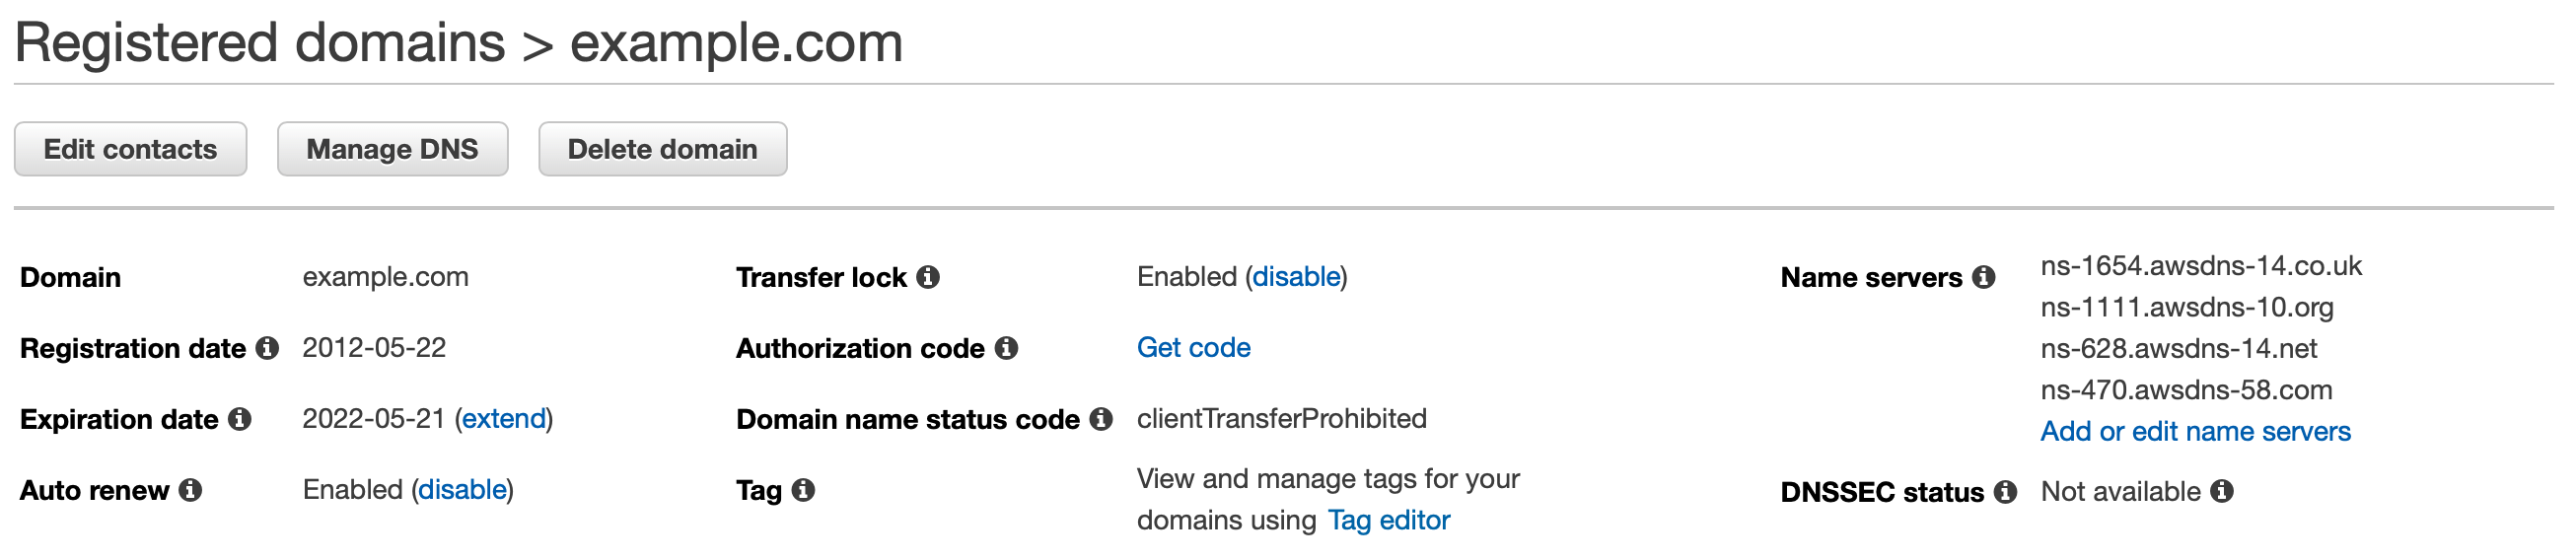
In the AWS console of the destination account, navigate to Route 53 > Registered domains, then click on the new domain. Edit contacts if necessary. Some registrars require email verification so ensure all email addresses are correct and up-to-date. Also, note that a lot of automatic certificate renewal processes, like AWS Certificate Manager, may require email approval before issuing certificates. That will require these contact details be correct.
Also review auto renew, set any AWS tags as needed, and ensure Transfer lock is enabled.
If you’re not using Route 53 as your hosted zone or you want the domain to continue using the hosted zone managed by the source AWS account, then you’re done. Otherwise, continue to the next steps.
Fourth, create a new hosted zone Link to heading
There is a way to do this programmatically, but I find it easier to do it manually in the web console.
- In Route 53 under Registered domains, click on your domain and look at DNSSEC status. If there is a key defined, you need to delete it. Click Manage keys, then delete all keys listed. (Records in your new hosted zone won’t be signed by the same private key as the old hosted zone, so DNS clients would stop returning records and you would experience an outage. Deleting public keys specified in the domain effectively disables DNSSEC validation by triggering a
DELETEaction of the DS record in the parent zone.) - Create a new hosted zone in Route 53. Type in the domain name, an optional description, and any tags you might want to associate. Leave the hosted zone type as Public.
- Add all your A, AAAA, CAA, MX, CNAME, TXT, and SVC records. Do NOT change/migrate the SOA or NS records.
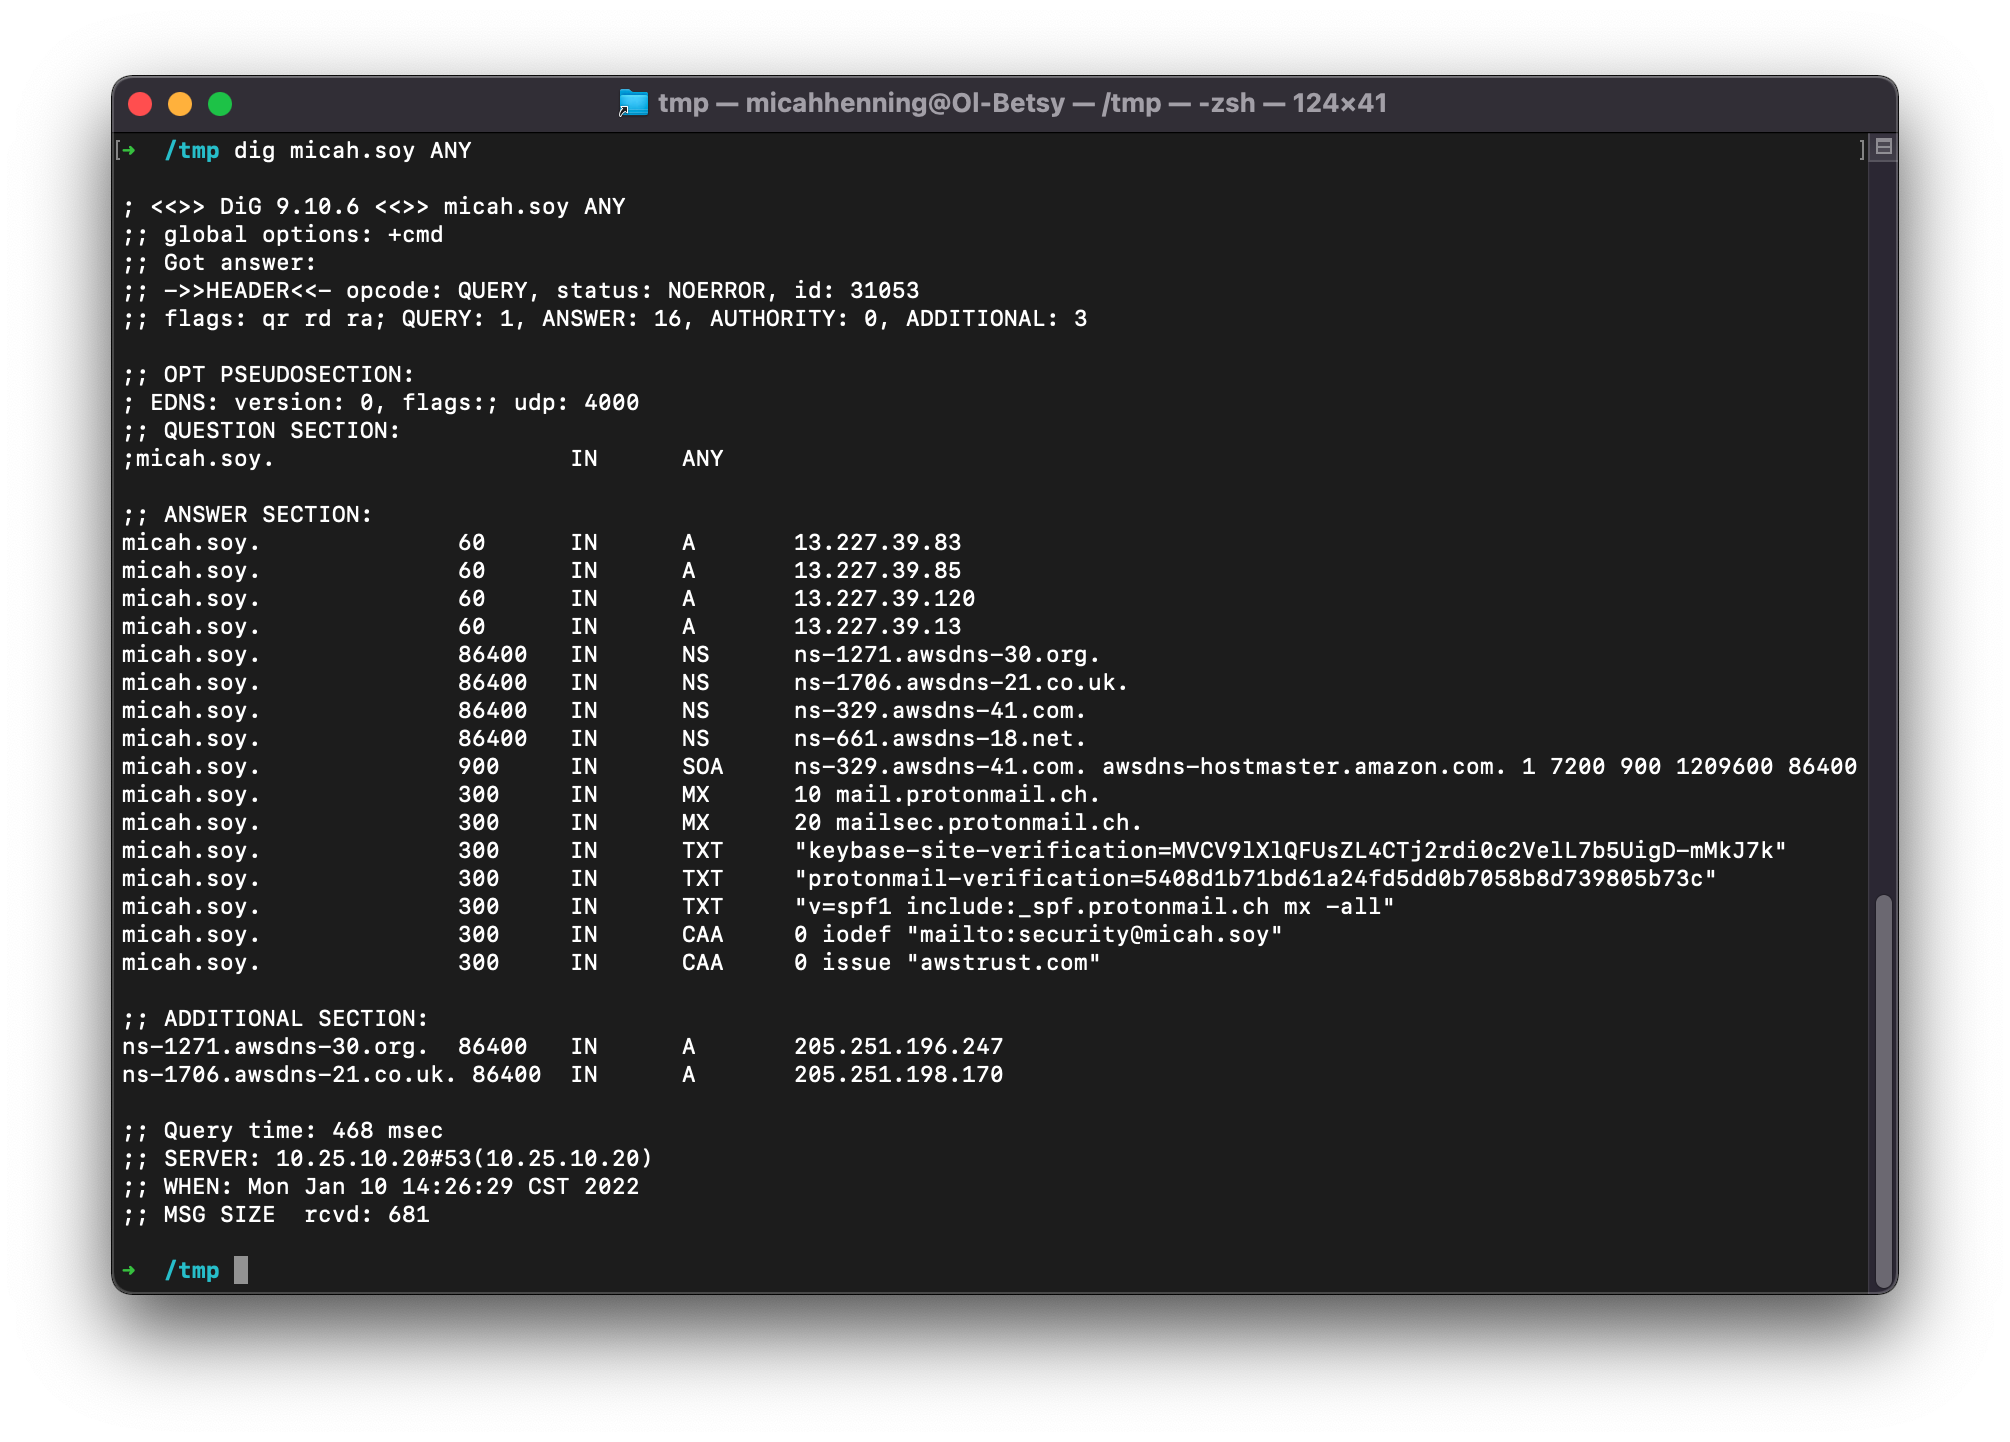
If you can’t obtain the list of records from the old hosted zone, you can get a list with dig, though you will have to run this command on every subdomain you know about. Also note that different DNS servers respond to this query in different ways. Do not assume you will get a comprehensive list. CloudFlare, for instance, doesn’t implement it at all. See RFC8482 for more information.
dig [domain] ANY
If the old hosted zone is using any aliases, like with CloudFront or S3, these resources need to be recreated and their DNS records properly set before updating the domain name servers in the final step.
If AWS certificate validation records exist in the old hosted zone, you may want to request new certificates in Certificate Manager and ensure they are issued properly with DNS validation prior to updating the name servers in the final step, else you will be reliant on certificates managed in the old account. Those certificates will not be able to renew unless the validation records exist in DNS.
Optionally, you may want to enable DNSSEC zone signing. Some folks argue that enabling DNSSEC makes reconnaissance easier for an attacker to discover assets. I think the assurance of domain record integrity vastly outweighs the reconnaissance risk, especially under the premise that one should not rely on obscurity as a security control.
To enable:
- Navigate to the DNSSEC signing tab under the hosted zone for your domain
- Click the Enable DNSSEC signing button
- Enter a name for the Key-signing key. I usually just use the domain name without the dot, like so:
examplecom - If you already have a customer-managed CMK, you can select it, otherwise you will need to create one. You may want to name it “dnssec” to identify its purpose down the road when viewing in AWS KMS. The CMK is used to create the KSK. The KSK is used to sign responses to client DNS requests.
See the developer guide for more information on enabling DNSSEC signing and establishing a chain of trust. Note that Step 1 in this guide is unnecessary since this is a new hosted zone.
Fifth, wait Link to heading
If DNSSEC was enabled on the domain before the transfer, you must wait a certain amount of time before completing the final step. Specifically, you must wait the maximum NS TTL for your domain and your parent zone. For example:
# How long to wait for micah.soy.?
dig soy NS

# Select one of the name servers to query the name servers for micah.soy.
dig @ns-tld2.charlestonroadregistry.com. micah.soy NS

# Record the highest TTL, in this case 10800 (3 hours).  then query one of the name servers for micah.soy.
dig @ns-1271.awsdns-30.org micah.soy NS

# Record the highest TTL, in this case 172800 (48 hours, or two days)
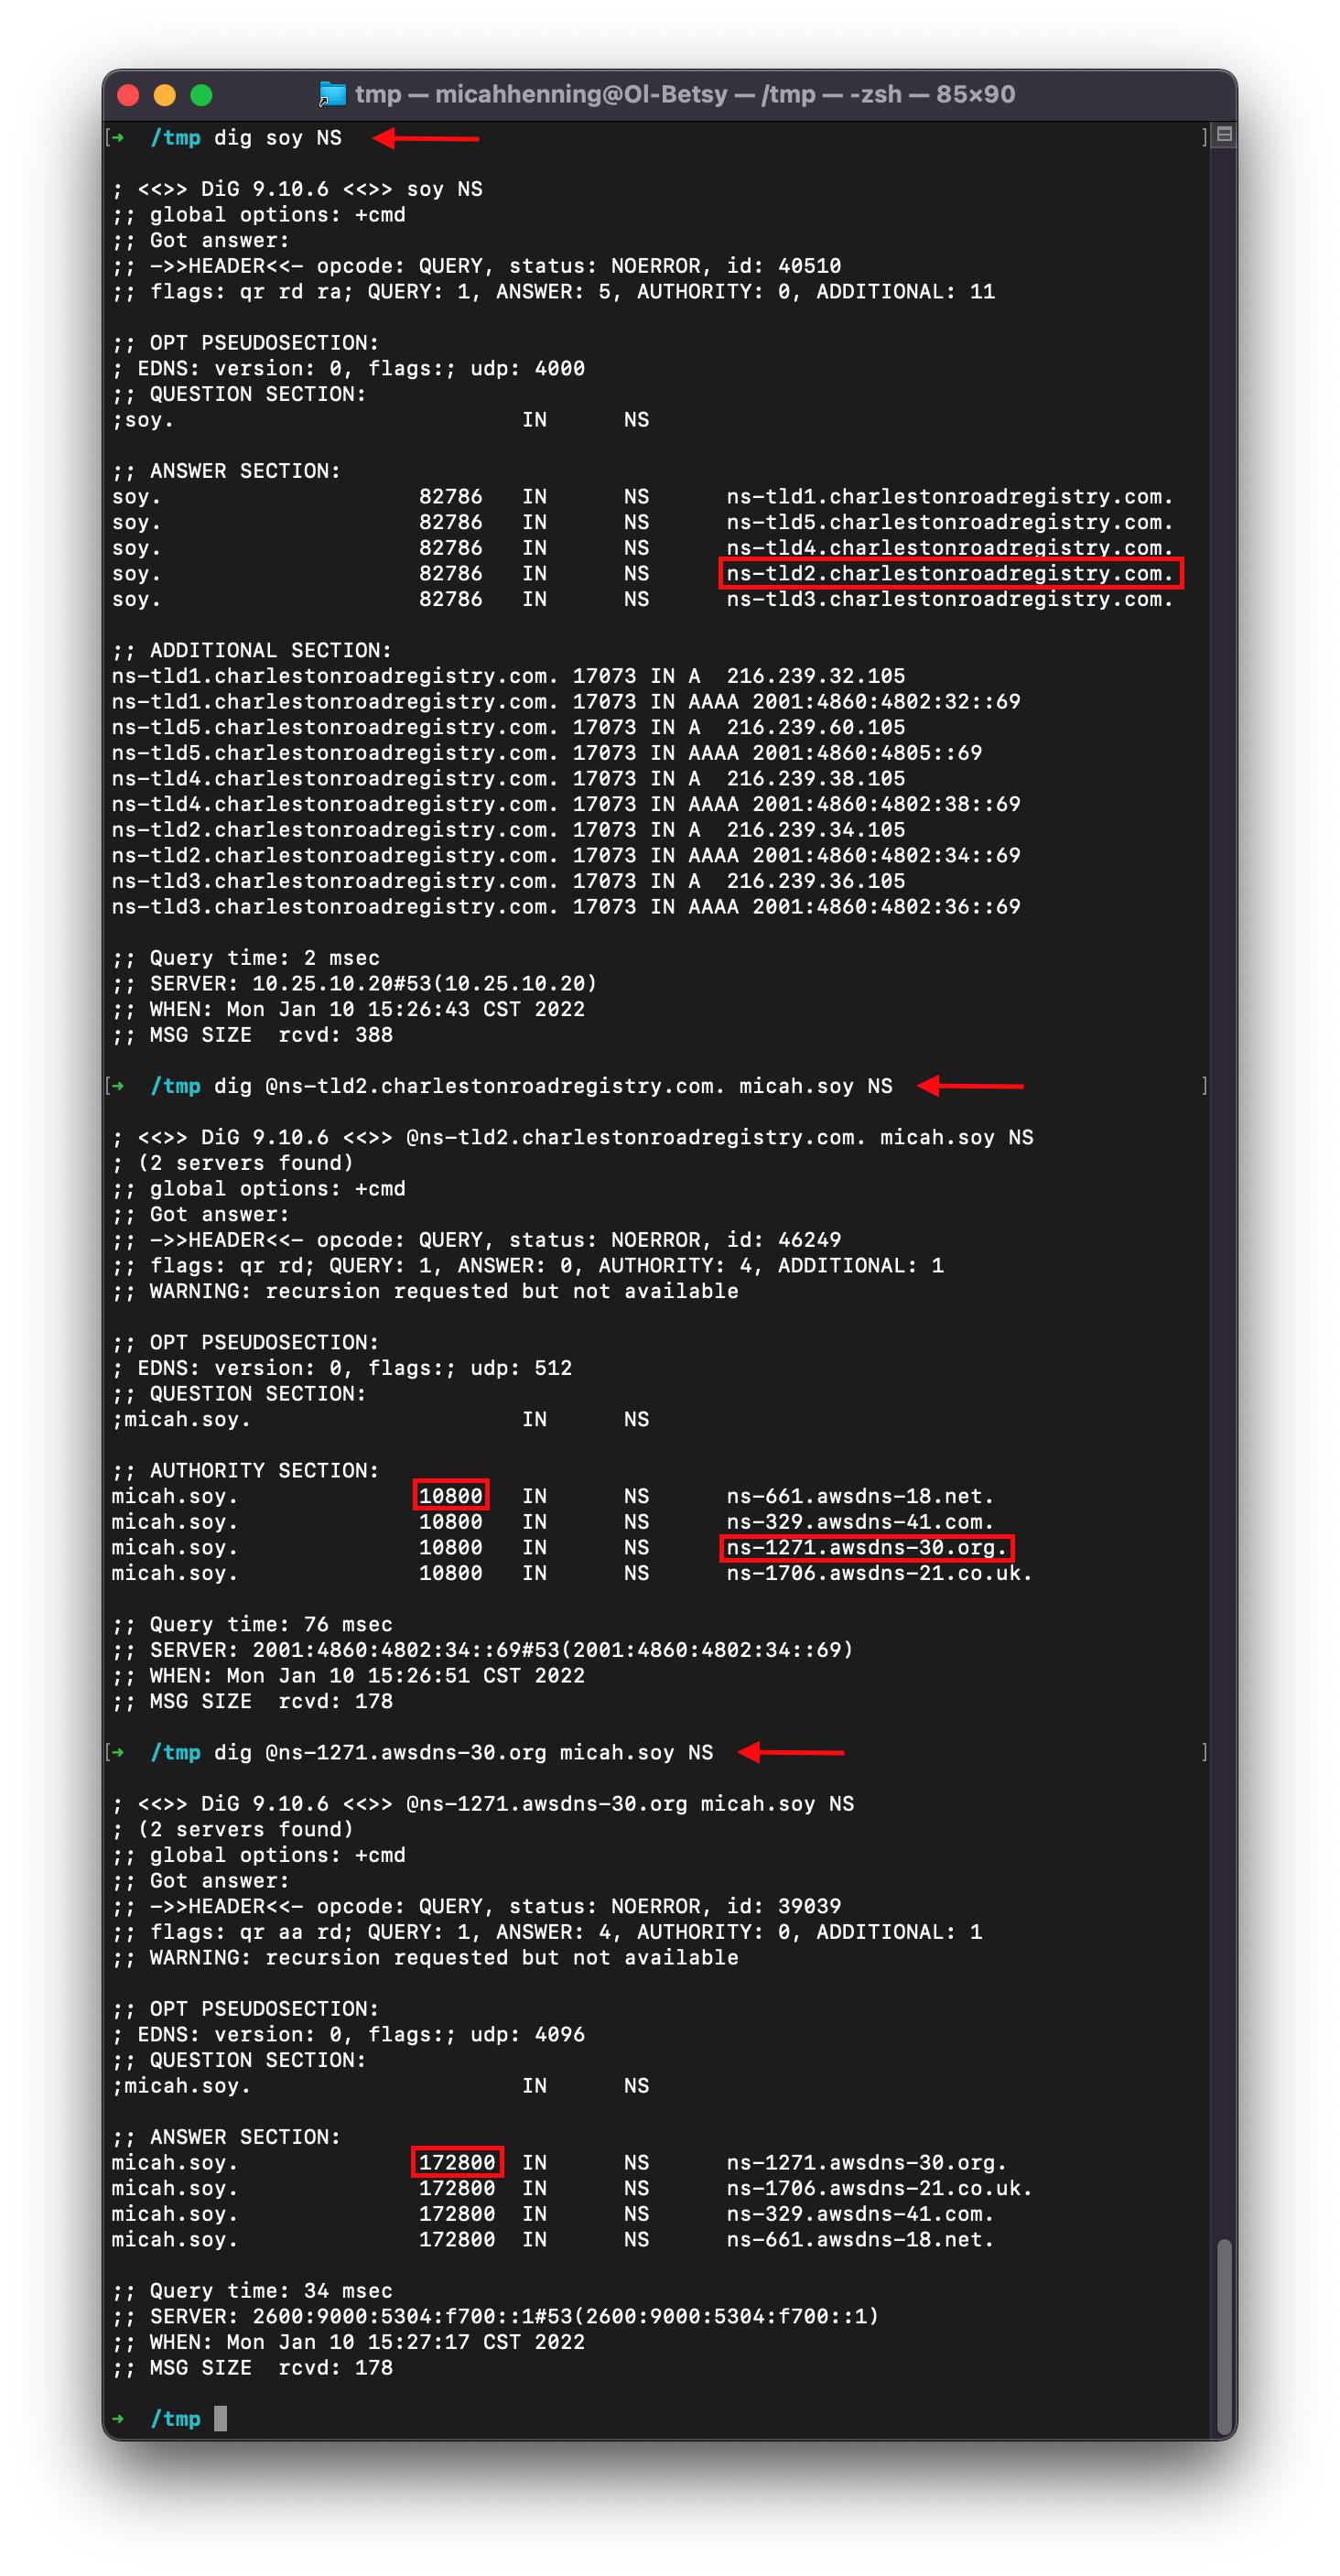
Since the highest TTL in this example is 2 days, you must wait at least that long before completing this step. If you don’t, the old DS record in the parent zone may be cached and applied to new records, causing a validation problem for some clients.
Finally, use the new hosted zone Link to heading
To use the new hosted zone, you just need to update the name server records in the domain. Take note of all the name servers (typically four) listed in the NS record in your hosted zone. Then, go to Registered Domains in Route 53 and click your domain name. Click “Add or edit name servers,” click the x next to each field to delete, then paste in the new records, one per field. If the link is not active, then DNSSEC is enabled because you skipped step 1 when creating the new hosted zone.
You must wait the maximum NS TTL determined in the previous step before removing the old hosted zone for clients who have cached responses. You must also wait the maximum TTL for a given resource before deleting that resource if it was migrated to the destination AWS account. For example, if you created a new CloudFront distribution in the destination account in place of one in the source account, you must wait at least the TTL value for that record before disabling or removing the distribution in the source account to avoid an outage.
Be sure to wait sufficient time and validate that all DNS records point to their intended resources before disabling or removing resources in the source AWS account.
# Get NS records from Public DNS and be sure these values match the NS record in your new hosted zone
dig @1.1.1.1 [domain] NS

# Verify mail and other records point to the right resources. these should all match the records in your new hosted zone
dig @1.1.1.1 [domain] MX
dig @1.1.1.1 [domain] A
dig @1.1.1.1 [domain] AAAA
dig @1.1.1.1 [domain] CNAME
dig @1.1.1.1 [domain] TXT

# Also check subdomains